玩家匹配队列
联机逻辑开发进度:■■□□□□□□□□□□
本章结束开发进度:■■■■■□□□□□□□
上一章的答案
index.html:
var app = new Vue({el: '#app',data: {message: 'Hello Vue!',websock: null,},created() {this.initWebSocket();},destroyed() {this.websock.close() //离开路由之后断开websocket连接},methods: {initWebSocket() { //初始化websocketconst wsuri = "ws://192.168.3.41:8811";this.websock = new WebSocket(wsuri);this.websock.onmessage = this.websocketonmessage;this.websock.onopen = this.websocketonopen;this.websock.onerror = this.websocketonerror;this.websock.onclose = this.websocketclose;},websocketonopen() { //连接建立之后执行send方法发送数据let actions = {"test": "12345"};this.websocketsend(actions);},websocketonerror() {//连接建立失败重连this.initWebSocket();},websocketonmessage(e) { //数据接收let message = JSON.parse(e.data);},websocketsend(Data) {//数据发送this.websock.send(JSON.stringify(Data));},websocketclose(e) { //关闭console.log('断开连接', e);},}})
记得将
192.168.3.41改为你的IP地址哦。
Server类:
<?php...class Server{...public function onWorkerStart($server, $workerId){echo "server: onWorkStart,worker_id:{$server->worker_id}\n";}public function onOpen($server, $request){DataCenter::log(sprintf('client open fd:%d', $request->fd));}public function onMessage($server, $request){DataCenter::log(sprintf('client open fd:%d,message:%s', $request->fd, $request->data));$server->push($request->fd, 'test success');}public function onClose($server, $fd){DataCenter::log(sprintf('client close fd:%d', $fd));}}...
写完以上代码后,在虚拟机中重新运行Server,在浏览器访问前端页面并打开F12开发者模式。
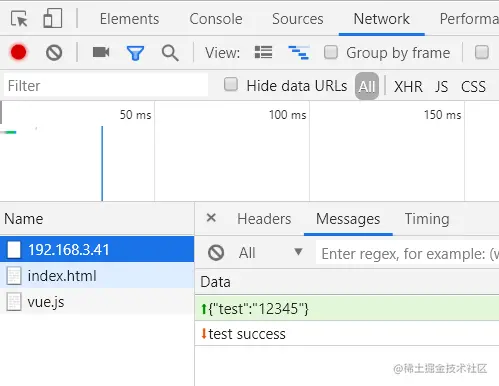
前端成功地发出了数据,服务端返回的数据也都接收到了,我们成功打通了游戏前后端。
游戏数据管理
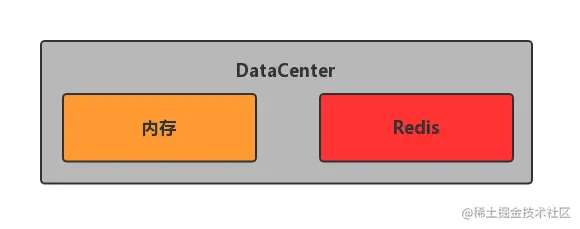
游戏的数据主要有两个存储方式:
- 内存:用于管理每局的游戏对战数据。
Redis:用于实现匹配队列、保存玩家信息数据。
我们首先在DataCenter类中新增一个静态变量$global,所有的对战房间数据都将存储在这个变量中。
DataCenter类:
class DataCenter{public static $global;...}
目前我们的游戏还没有Redis连接方式,需要编写一个Redis驱动。
做题时间
- 在
app目录下新建Lib目录,并新建一个Redis.php文件。 - 使用单例模式编写
Redis驱动。 - 在
DataCenter类中,新增静态方法redis()返回一个Redis实例。
Redis类:
<?phpnamespace App\Lib;class Redis{protected static $instance;protected static $config = ['host' => '127.0.0.1','port' => 6379,];/*** 获取redis实例** @return \Redis|\RedisCluster*/public static function getInstance(){if (empty(self::$instance)) {$instance = new \Redis();$instance->connect(self::$config['host'],self::$config['port']);self::$instance = $instance;}return self::$instance;}}
DataCenter类:
class DataCenter{...public static function redis(){return Redis::getInstance();}...}
到这里为止所有准备都做好了,下面开始正式进入到游戏功能开发。
进入匹配队列
我们首先要做的第一个功能就是游戏匹配。
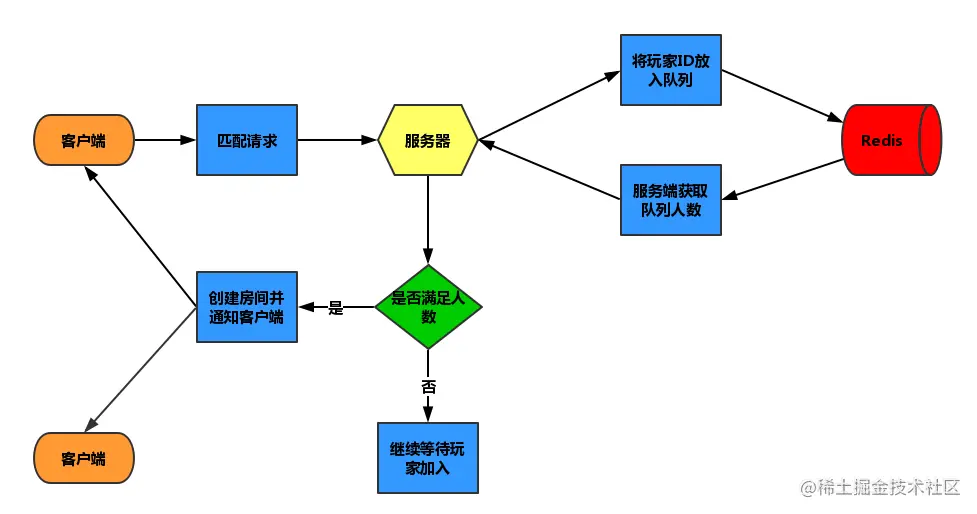
赵童鞋的想法是:
- 客户端发送一个匹配消息到服务端。
- 服务端将玩家的ID放入一个
Redis队列里。 - 当队列里人数满足条件时,创建一个游戏房间。
- 根据
player_id获取连接fd,发送游戏数据。
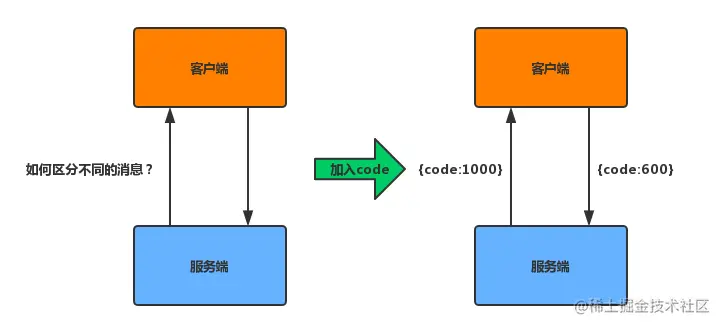
WebSocket并不像普通的HTTP请求那样,一个功能对应一个接口,那我们要怎么区分发送和接收的消息呢?很简单,我们只要固定发送和接收数据的格式,其中加入一个参数code作为功能协议标识,所有的操作都根据发送和接收的code来进一步处理。
是不是看上去还挺好理解呢?我们先从前端入手。
做题时间
- 新增输入框,绑定
Vue数据属性playerId,并默认生成一个随机ID。 - 新增按钮,绑定
Vue方法matchPlayer,点击按钮时发送code为600的数据到服务端。 - 在
WebSocket连接的时候,发送玩家playerId到服务端。
index.html
...<div id="app"><label>玩家ID:<input type="text" :value="playerId"></label><button @click="matchPlayer">匹配</button></div><script>var app = new Vue({...data: {playerId: 'player_' + Math.round(Math.random() * 1000),...},...methods: {//匹配玩家matchPlayer() {let actions = {"code": 600};this.websocketsend(actions);},initWebSocket() { //初始化websocketconst wsuri = "ws://192.168.3.41:8811?player_id=" + this.playerId;...},...}})</script>...
前端代码不多,下面轮到服务端实现。
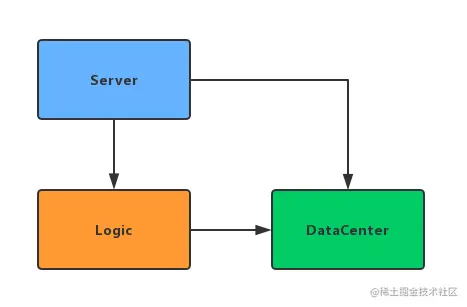
服务端将会涉及到三个类,也就是Server、Logic、DataCenter,这三个类的调用顺序是:
- 第一次连接时,
Server将用户信息如playerId保存到DataCenter Server接收到操作指令,调用Logic中的逻辑方法。Logic中的逻辑调用DataCenter进行数据操作。
Server类
我们采用自顶向下的方法来编写试试,不存在的方法也可以先写出来调用。
先从Server开始。从前端代码可以看到,在WebSocket建立连接的时候,前端会发送player_id到服务端,这个时候我们需要把player_id和连接fd保存在DataCenter中,方便服务端后续向客户端发送消息时,可根据player_id获取连接fd。其他操作指令会带有一个code用来标识协议码,我们需要根据code为600时,调用Logic进行匹配。
做题时间
- 在
Server类初始化的时候,新建Logic对象并保存在私有变量$logic,用于调用Logic类中的方法。 - 在
onOpen事件中,传递用户的player_id和fd到DataCenter的setPlayerInfo()方法中进行保存。 - 在
onMessage事件中,根据当前连接的fd获取player_id,当前端发送的消息中的code为600时,调用Logic中的matchPlayer()方法 - 在
onClose事件中,调用delPlayerInfo()方法根据$fd清除玩家信息。
Swoole WebSocket onMessage: wiki.swoole.com/wiki/page/4…
Server类:
<?php...class Server{const CLIENT_CODE_MATCH_PLAYER = 600;...private $logic;public function __construct(){$this->logic = new Logic();...}...public function onOpen($server, $request){DataCenter::log(sprintf('client open fd:%d', $request->fd));$playerId = $request->get['player_id'];DataCenter::setPlayerInfo($playerId, $request->fd);}public function onMessage($server, $request){DataCenter::log(sprintf('client open fd:%d,message:%s', $request->fd, $request->data));$data = json_decode($request->data, true);$playerId = DataCenter::getPlayerId($request->fd);switch ($data['code']) {case self::CLIENT_CODE_MATCH_PLAYER:$this->logic->matchPlayer($playerId);break;}}public function onClose($server, $fd){DataCenter::log(sprintf('client close fd:%d', $fd));DataCenter::delPlayerInfo($fd);}...}...
Logic类
下面到Logic类,Logic其实代码不多,他需要实现的就是接收Server传递的消息并执行具体的逻辑。
做题时间
新增
matchPlayer()方法,将Server传递过来的player_id放入DataCenter的匹配队列中。<?php … class Logic {
public function matchPlayer($playerId){DataCenter::pushPlayerToWaitList($playerId);}
}
DataCenter类
有了上述两个类的调用,我们的DataCenter需求就清晰很多了,需要实现用户信息的存取,需要实现一个队列的进出和长度查询,用于玩家匹配。
做题时间
- 新增常量
PREFIX_KEY,作为所有Redis的key前缀,区别于其他应用缓存值。 - 为
playerId和fd编写基于Redis实现的set、get和delete方法,需要实现playerId和fd可以互相查找。 - 实现匹配队列的
push、pop、getLength方法。 - 完成
Server调用的setPlayerInfo()方法,保存player_id和fd。完成delPlayerInfo()方法,清除玩家数据。
本章作为第一个游戏功能开发,请童鞋们尽量完成Homework哦,其他功能如邀请、观战也将会是这个调用流程。
本章对应Github Commit:第六章结束
当前目录结构:
HideAndSeek├── app│ ├── Lib│ │ └── Redis.php│ ├── Manager│ │ ├── DataCenter.php│ │ ├── Game.php│ │ └── Logic.php│ ├── Model│ │ ├── Map.php│ │ └── Player.php│ └── Server.php├── composer.json├── composer.lock├── frontend│ └── index.html├── test.php└── vendor├── autoload.php└── composer
